Ansible Group Vars: Scaling Your Automation for Dev, QA, and Production
Oct 04, 2025
In our last post, you learned how to stop writing brittle scripts by using Ansible Facts. Your automation is now intelligent–it can discover a server's environment and adapt its actions accordingly. It's a big step forward.
But with that success comes a new, more complex challenge: scale.
You're no longer managing a single server. You're responsible for a whole fleet across Development, QA, and Production.
That single playbook now needs to handle different configurations for each environment.
The "Automation Mechanic" solves this by creating playbook_configureDev.yml, playbook_configureQA.yml, and playbook_configureProd.yml. This copy-paste approach is a maintenance nightmare and makes it dangerously easy to push a dev setting to production.
The "Automation Architect", however, designs a single, elegant system to manage all environments. Their blueprint for this is Ansible Group Vars.
What Are Group Vars?
group_vars is an Ansible feature that lets you assign variables to entire groups of servers defined in your inventory. Instead of hardcoding values in your playbook, you externalize them into files. Ansible automatically loads the variables from these files when it runs against a specific group.
This is the key to separating your playbook's logic from your environment's configuration.
Let's use a scenario of a DBA who needs to manage sysadmin privileges in both Dev and Production environments. We'll accomplish this by defining our inventory with the appropriate groups, creating a group_vars directory along with a group_vars file for each group, and finally creating a playbook that leverages the ansible.windows.win_dsc module and the SqlServerDSC resource. This playbook will also take care of adding the specified group to the local admins group on the server (showing a combination of managing both Windows and SQL Server permissions seamlessly). Our example environment only includes one managed node for each environment, but this type of operation could scale to hundreds of servers very easily.
Let's jump in.
Step 1: Structuring Your Inventory and Group Vars
First, let's organize our inventory to define our different environments.
hosts.ini
[sqlservers]
PRODSQL1.SANDBOX.LOCAL sql_instance_name="MSSQLSERVER"
DEVSQL1.SANDBOX.LOCAL sql_instance_name="MSSQLSERVER"

[sqlservers_dev]
DEVSQL1.SANDBOX.LOCAL

[sqlservers_prod]
PRODSQL1.SANDBOX.LOCAL

[all:vars]
ansible_connection=ssh
ansible_shell_type=powershell
ansible_ssh_common_args='-o GSSAPIAuthentication=yes -o GSSAPIDelegateCredentials=yes'
ansible_ssh_transport = kerberos
ansible_user = YourUserName
Next, create a group_vars directory.
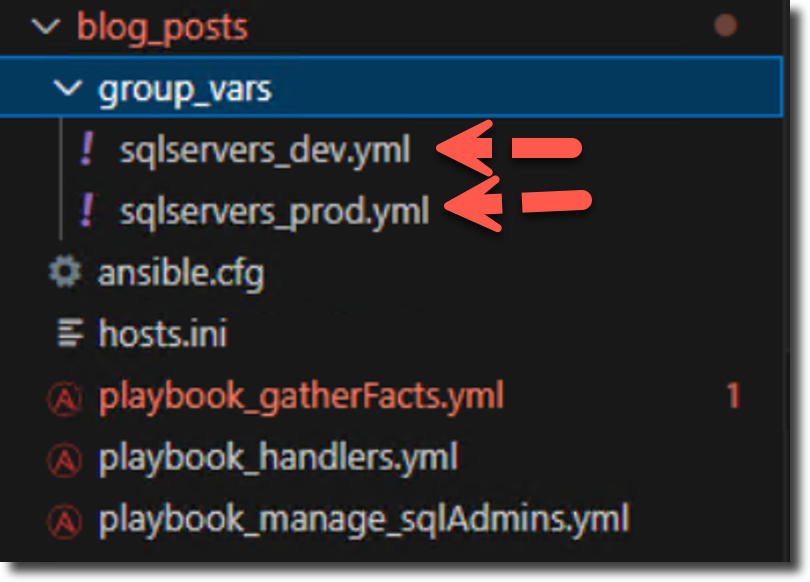
This child directory should be created within the same directory as your playbook. Inside, create YAML files that exactly match your inventory group names (sqlservers_dev.yml and sqlservers_prod.yml). In my example, I'm using a root folder named blog_posts. Pro-tip–Visual Studio Code makes keeping track of your Ansible project files easy.
Step 2: A Real-World Security Policy: Managing Admin Rights
Let's create a playbook to manage who gets sysadmin rights in each environment. Your security policy is:
- On Production servers, only the SANDBOX\Prod_SQLAdmins group should be sysadmin.
- On Development servers, the SANDBOX\Dev_SQLAdmins group requires sysadmin access, but the Prod_SQLAdmins group also needs access for troubleshooting purposes.
We define this policy in our group_vars files using a variable called sqladmin_logins.
sqlservers_dev.yml
---
# this is a list or an array
sqladmin_logins:
  - SANDBOX\Dev_SQLAdmins
  - SANDBOX\Prod_SQLAdmins
sqlservers_prod.yml
---
sqladmin_logins:
  - SANDBOX\Prod_SQLAdmins
Now, we create a single playbook to enforce this policy.
playbook_manage_sqlAdmins.yml
---
- name: Manage SQL sysadmins Role Membership and Local Windows Admins Group
  hosts: sqlservers
  gather_facts: true

  vars_prompt:
    - name: "sql_dsc_cred_password"
      prompt: "Enter the password for the DSC RunAs user"
      private: true

  tasks:
    - name: Add group to Local Administrators group
      ansible.windows.win_group_membership:
        name: "Administrators"
        members: "{{ item }}"
        state: present
      loop: "{{ sqladmin_logins }}"

    - name: Create login for the SQL Admins group
      ansible.windows.win_dsc:
        resource_name: SqlLogin
        Name: "{{ item }}"
        LoginType: "WindowsGroup"
        ServerName: "localhost"
        InstanceName: "{{ sql_instance_name }}"
        Ensure: "Present"
        PsDscRunAsCredential_username: "{{ ansible_user }}"
        PsDscRunAsCredential_password: "{{ sql_dsc_cred_password }}"
      loop: "{{ sqladmin_logins }}"

    - name: Add SQL Admins group to sysadmin role
      ansible.windows.win_dsc:
        resource_name: SqlRole
        ServerRoleName: "sysadmin"
        MembersToInclude: "{{ item }}"
        ServerName: "localhost"
        InstanceName: "{{ sql_instance_name }}"
        Ensure: "Present"
        PsDscRunAsCredential_username: "{{ ansible_user }}"
        PsDscRunAsCredential_password: "{{ sql_dsc_cred_password }}"
      loop: "{{ sqladmin_logins }}"
The playbook performs three main actions in sequence for every group listed in the sqladmin_logins variable:
-
Grants OS-Level Admin Rights: It adds the specified groups to the local Administrators group on the Windows server. This is done using the
ansible.windows.win_group_membershipmodule. -
Creates a SQL Server Login: It creates a login within the SQL Server instance for each Windows group that does not already exist.
-
Assigns
sysadminRole: It adds the newly created login to thesysadminfixed server role, granting full control over the SQL Server instance.
The last two steps are accomplished by leveraging PowerShell Desired State Configuration (DSC) through Ansible's ansible.windows.win_dsc module, specifically using the SqlLogin and SqlRole resources from the SqlServerDsc module.
How it Works
-
Hosts: The playbook targets all servers listed under the
sqlserversparent group in your Ansible inventory file. -
Secure Credentials: It starts by securely prompting the user for a password using
vars_prompt. This password, combined with theansible_user, is used as aRunAsCredentialfor the DSC resources, ensuring the tasks have the necessary permissions to make changes within SQL Server. For full automation, you could replace this with variables that reside within the group_vars file but are encrypted using Ansible Vault. -
Looping: The playbook is highly efficient because it uses a
loop. It iterates over thesqladmin_loginslist variable and runs all three tasks for each group in the list. This avoids code duplication and makes it easy to manage which groups get admin access by simply editing the variable list. -
Idempotency: The playbook is idempotent, meaning it can be run repeatedly without causing harm. Using
state: presentandEnsure: "Present"ensures that if the groups are already configured correctly, Ansible will report "ok" and make no changes. It only takes action if the current state doesn't match the desired state.
Note: MembersToInclude vs. Members
In the final task, we use the MembersToInclude parameter. This is a critical decision when working with the SqlRole resource.
- MembersToInclude is additive. It ensures that the groups in our list are assigned the sysadmin role, but it will not remove any existing logins.
- Members, on the other hand, is declarative. It makes the role's membership an exact match to your list, removing anyone who isn't specified. While powerful for enforcing a strict policy, it's also more dangerous and could lead to accidentally locking out other necessary accounts. For our example, MembersToInclude is the safer choice.
Run the Playbook
Before we do, let's review the local admins group in Windows and the sysadmin server role in each SQL Server instance.
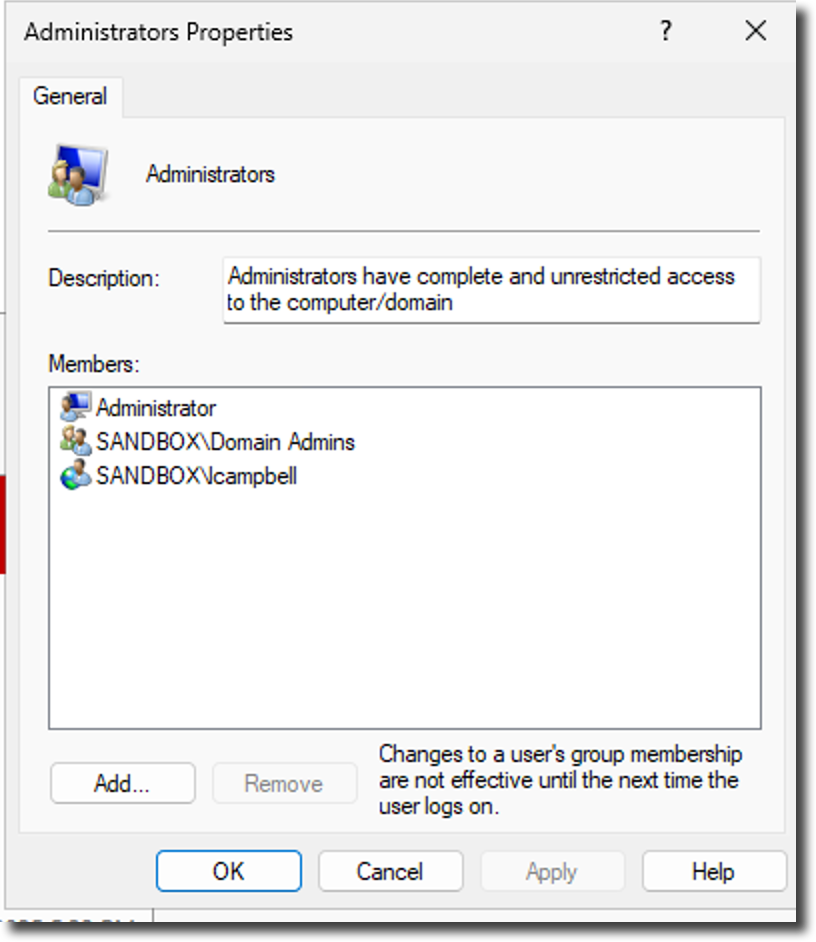
DEVSQL1
Windows Administrators Group
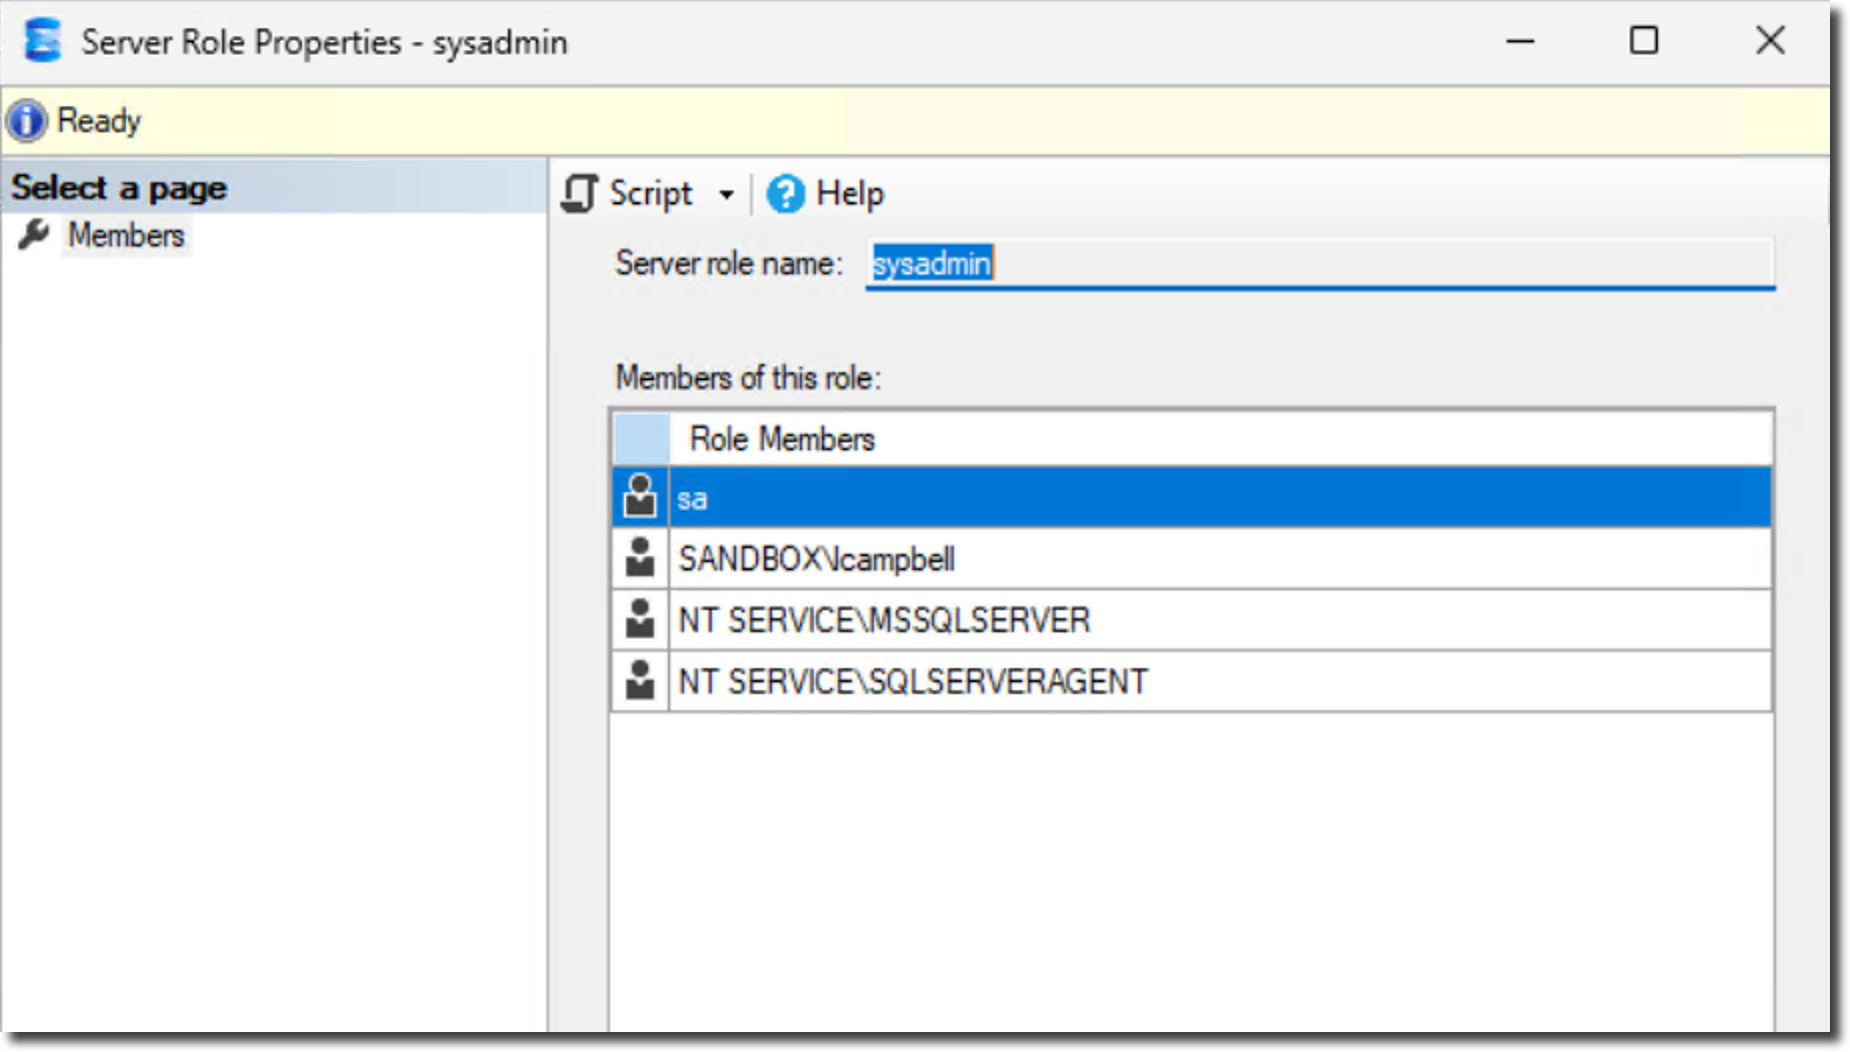
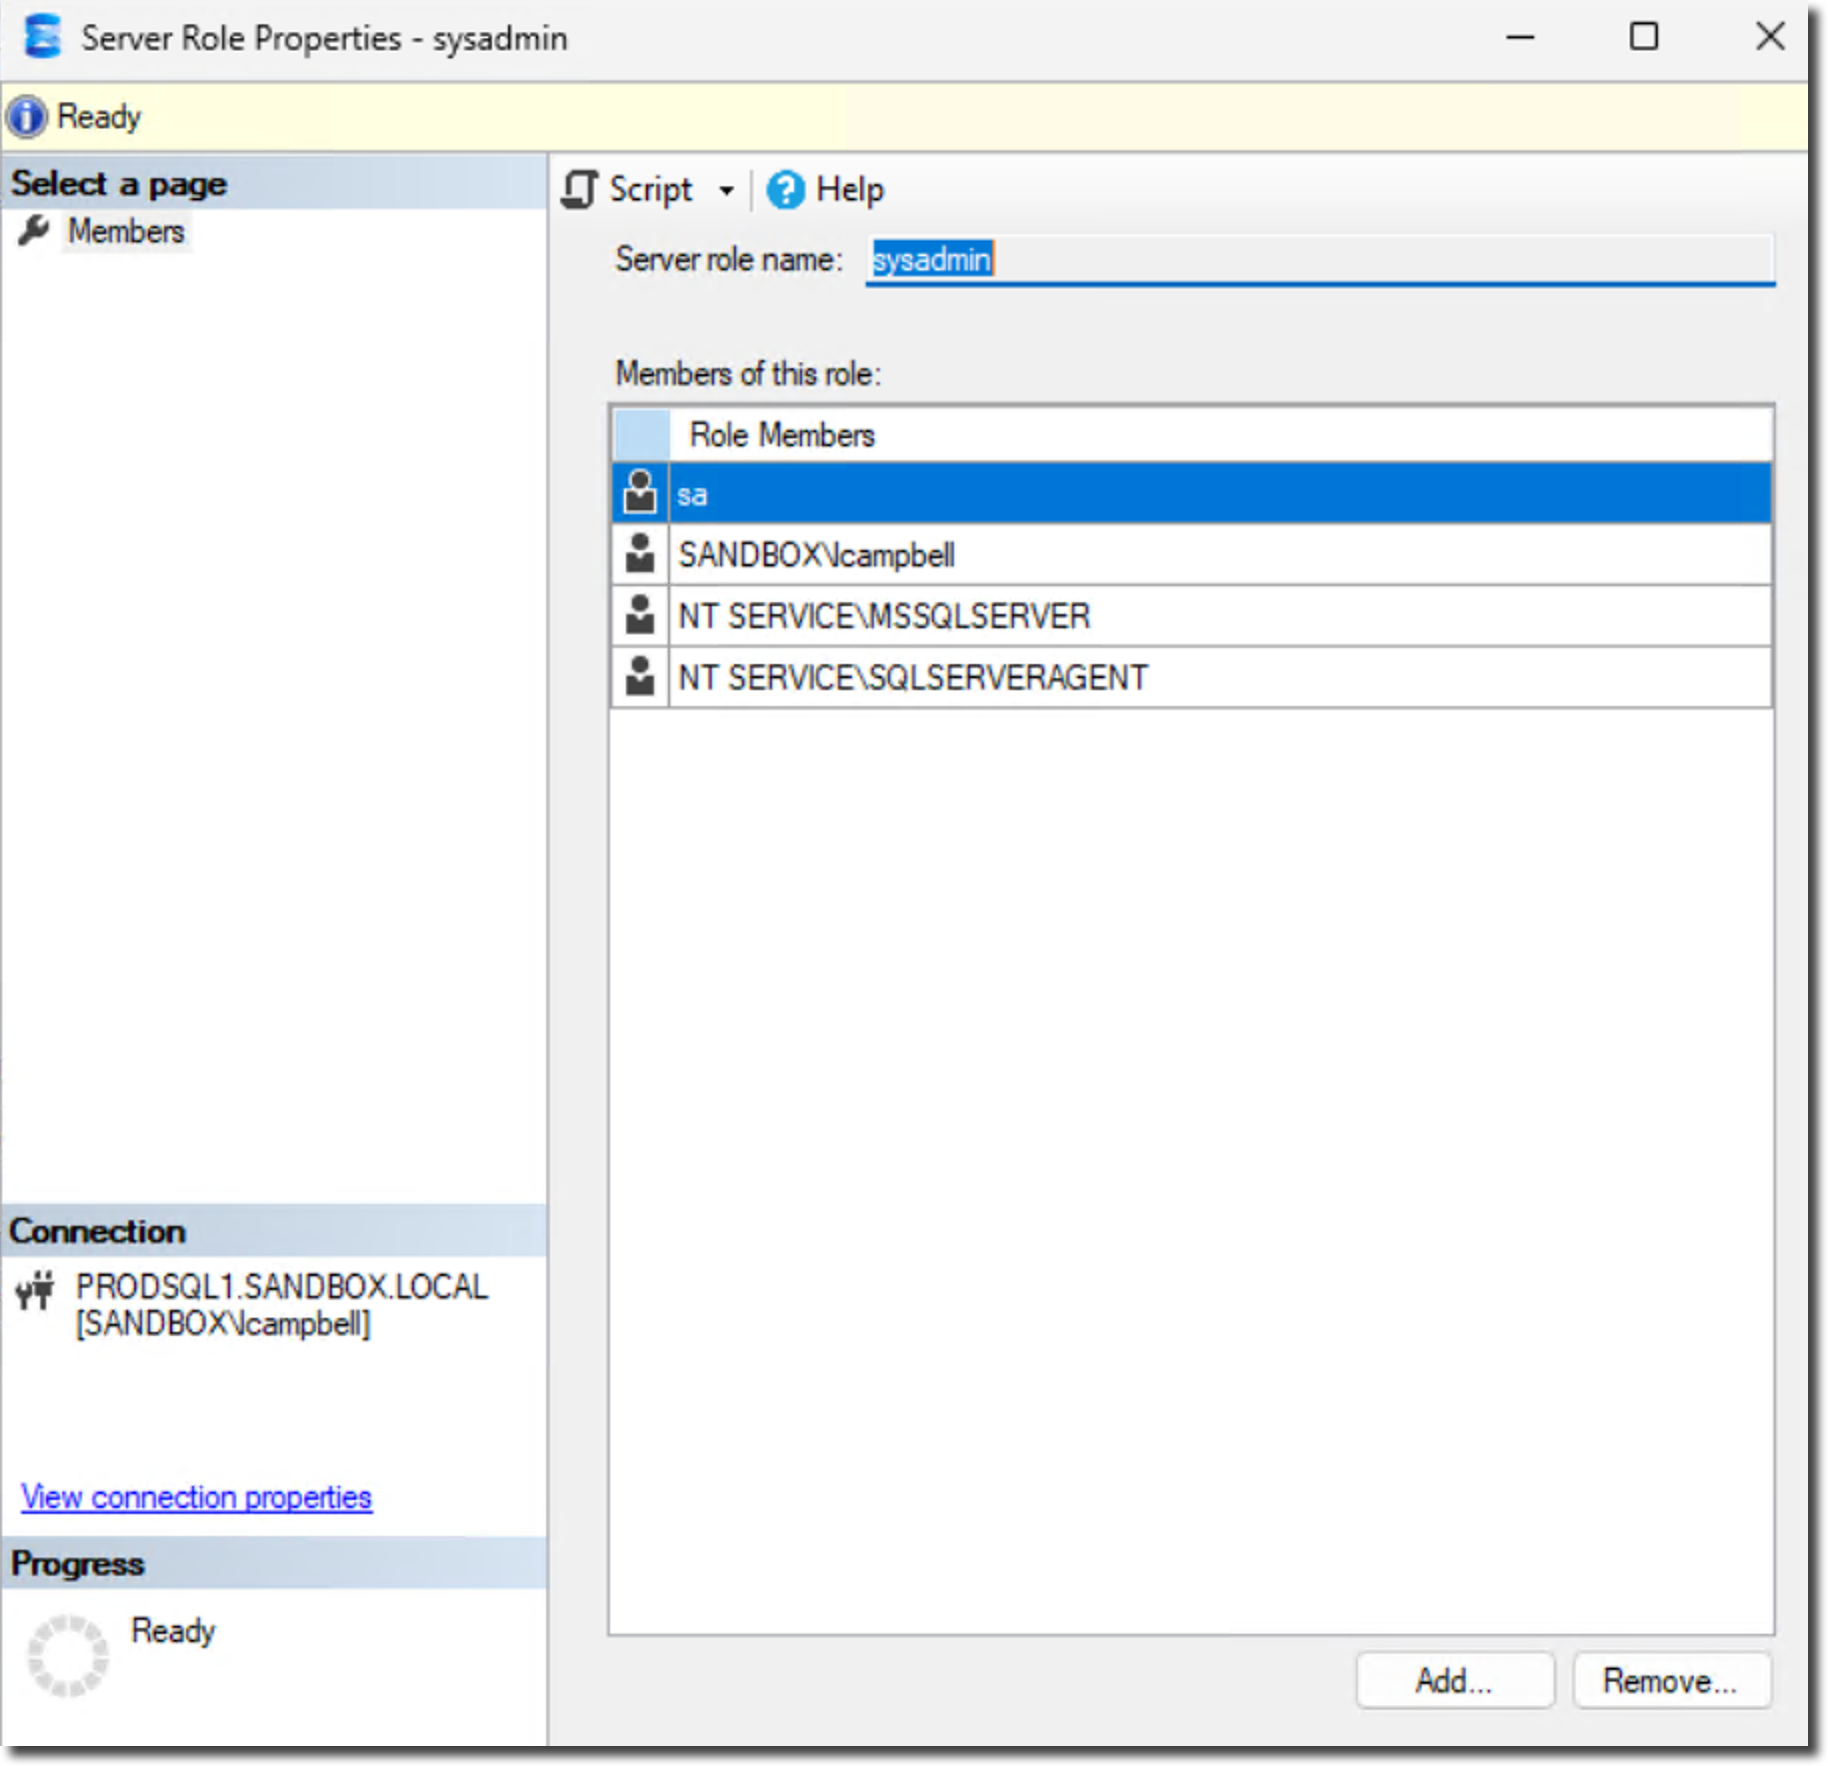
SQL Server - Sysadmin role
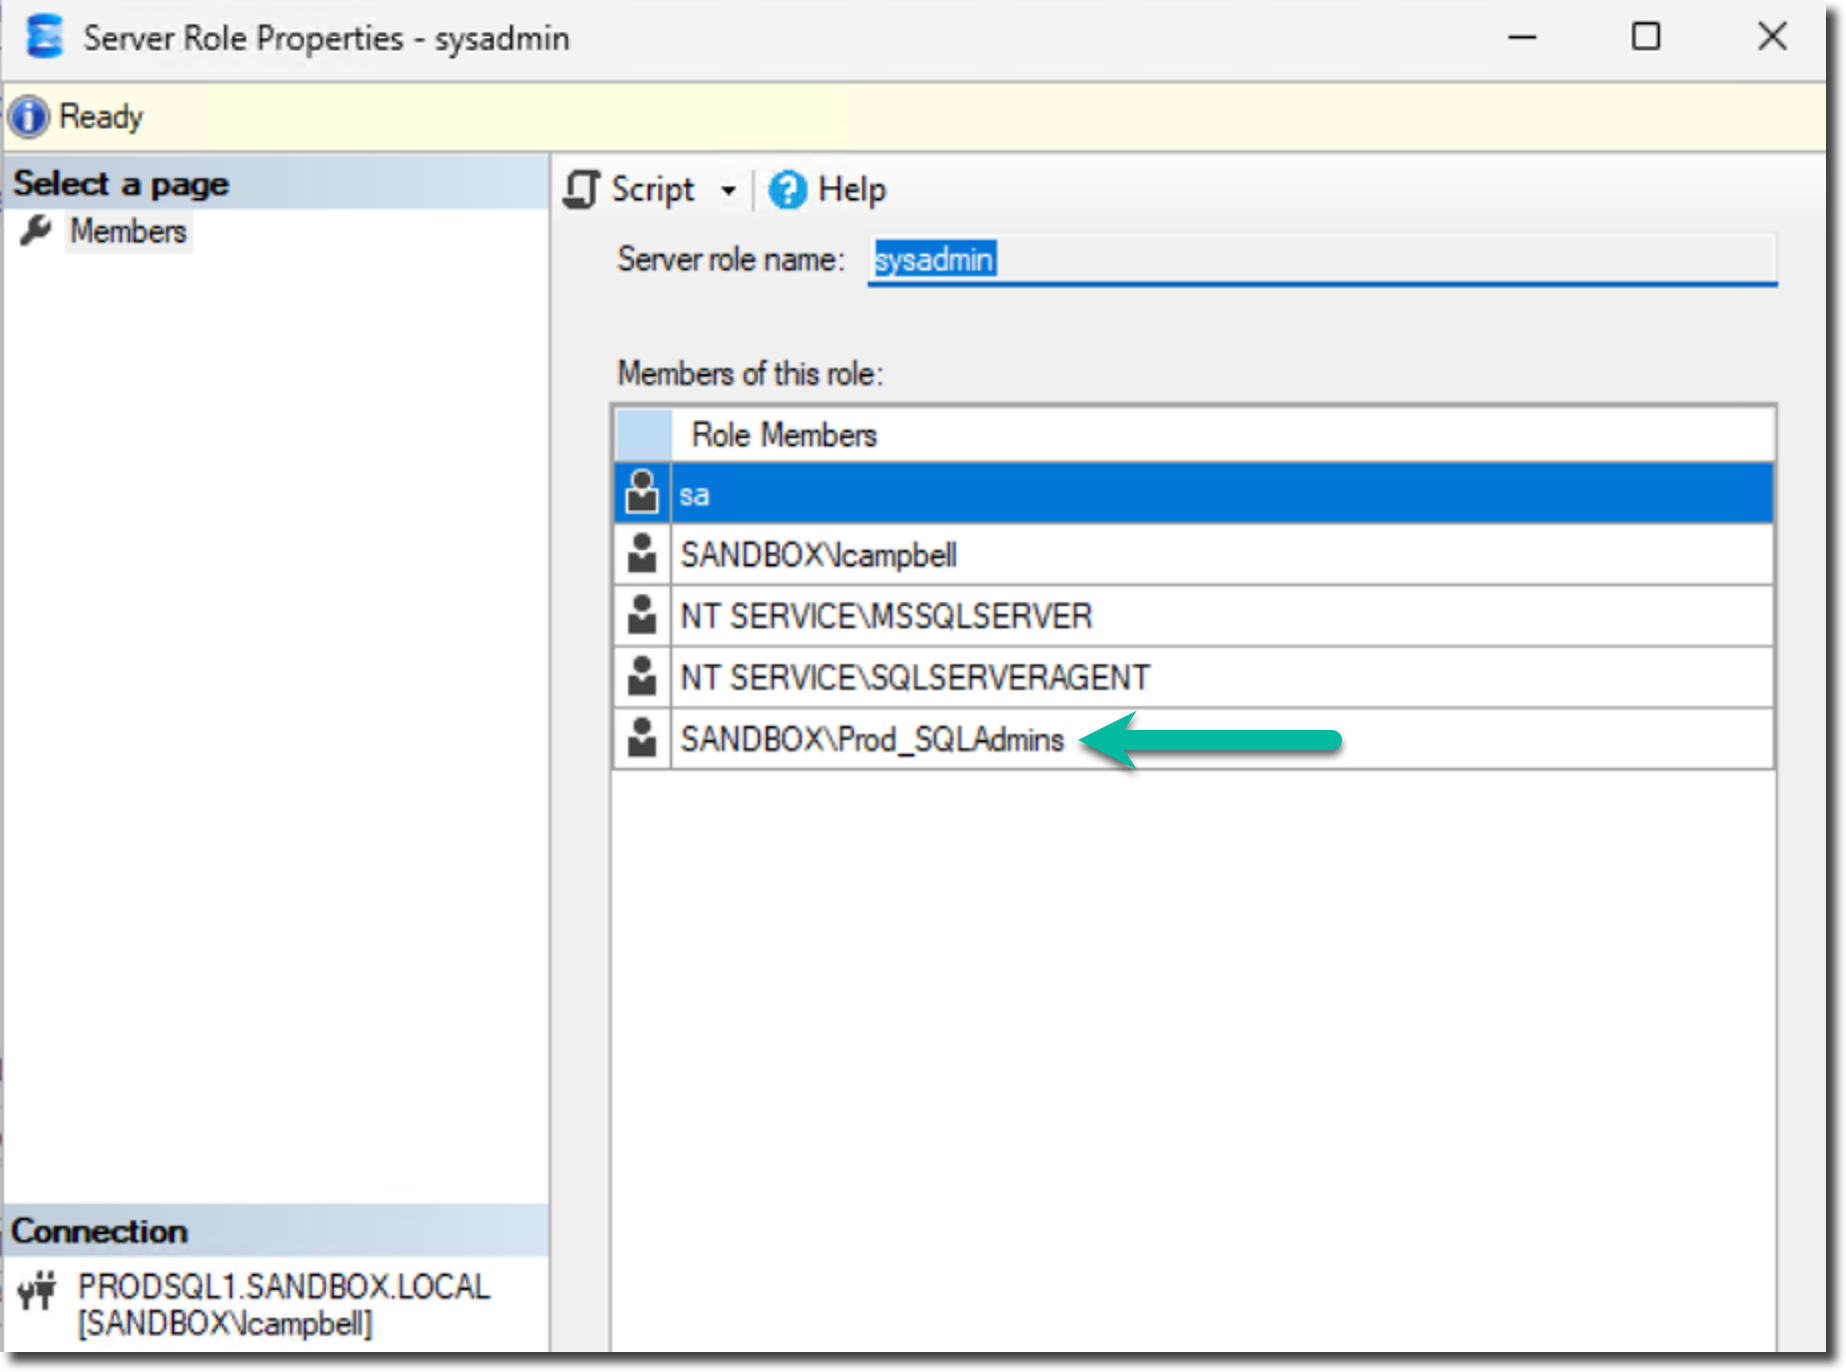
PRODSQL1
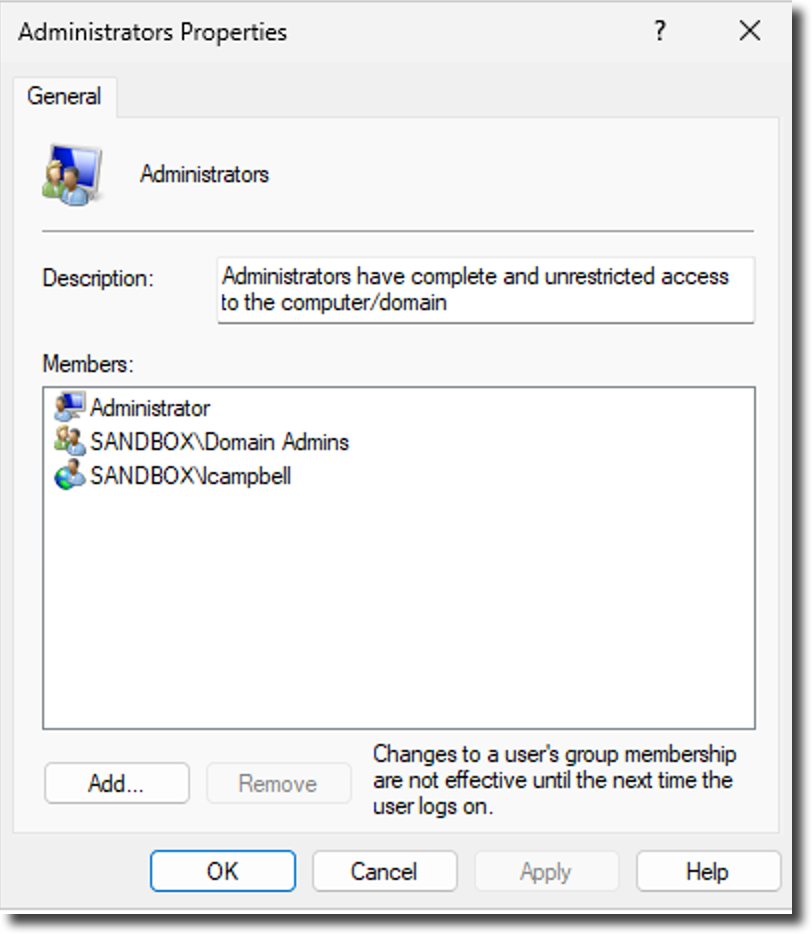
Windows Administrators Group
SQL Server - Sysadmin role
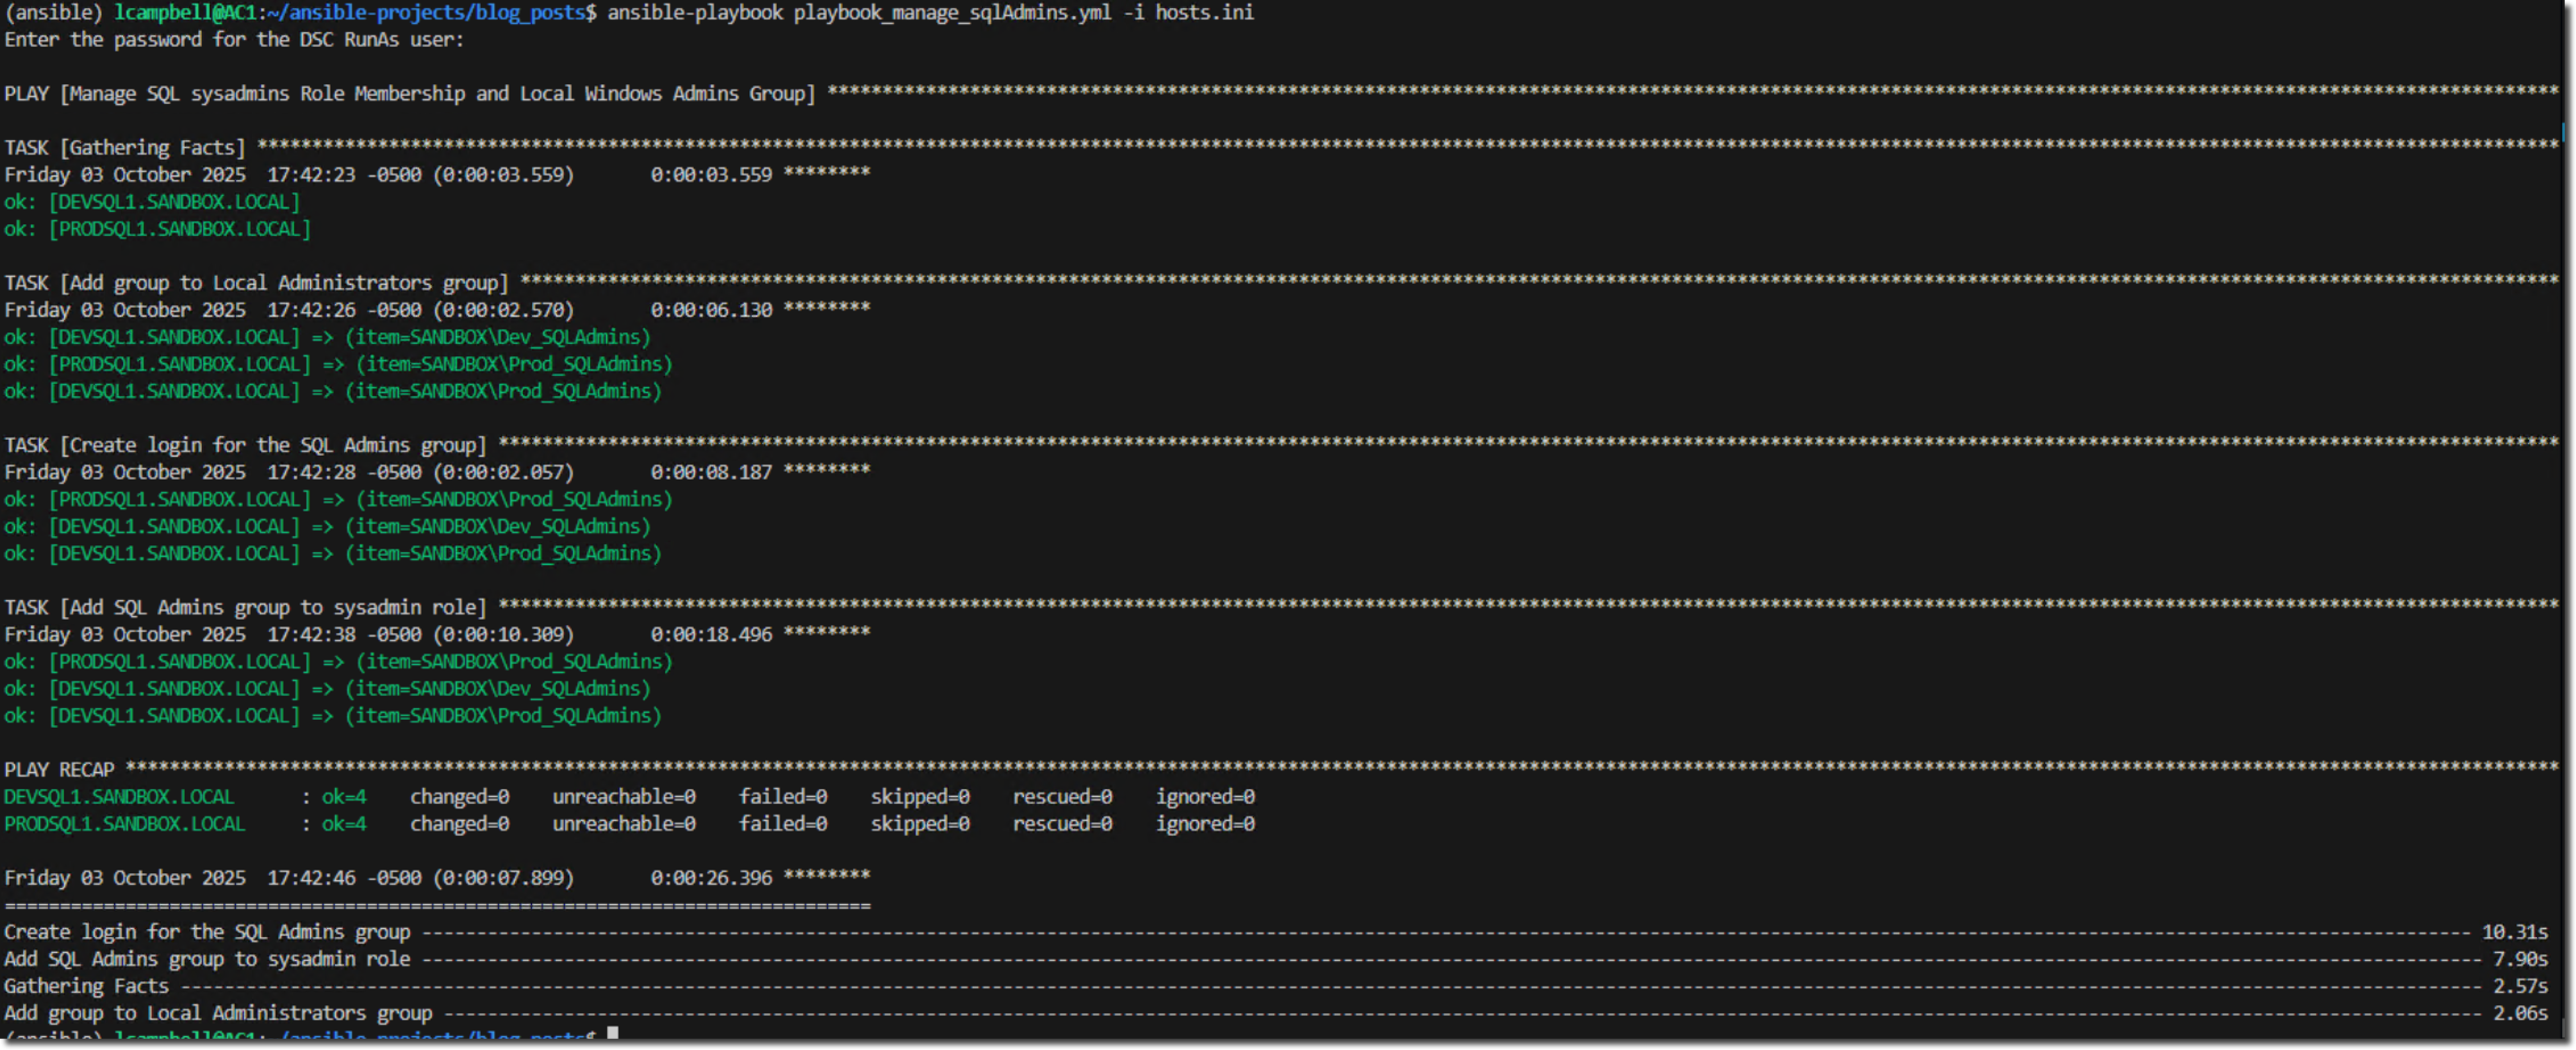
Now, I'll run the playbook against the two environments - ansible-playbook playbook_manage_sqlAdmins.yml -i hosts.ini
For this example, you'll get a prompt for the DSC RunAs user password. The RunAs user uses the ansible_user variable we defined within the hosts.ini file. Provide that password and press Enter.
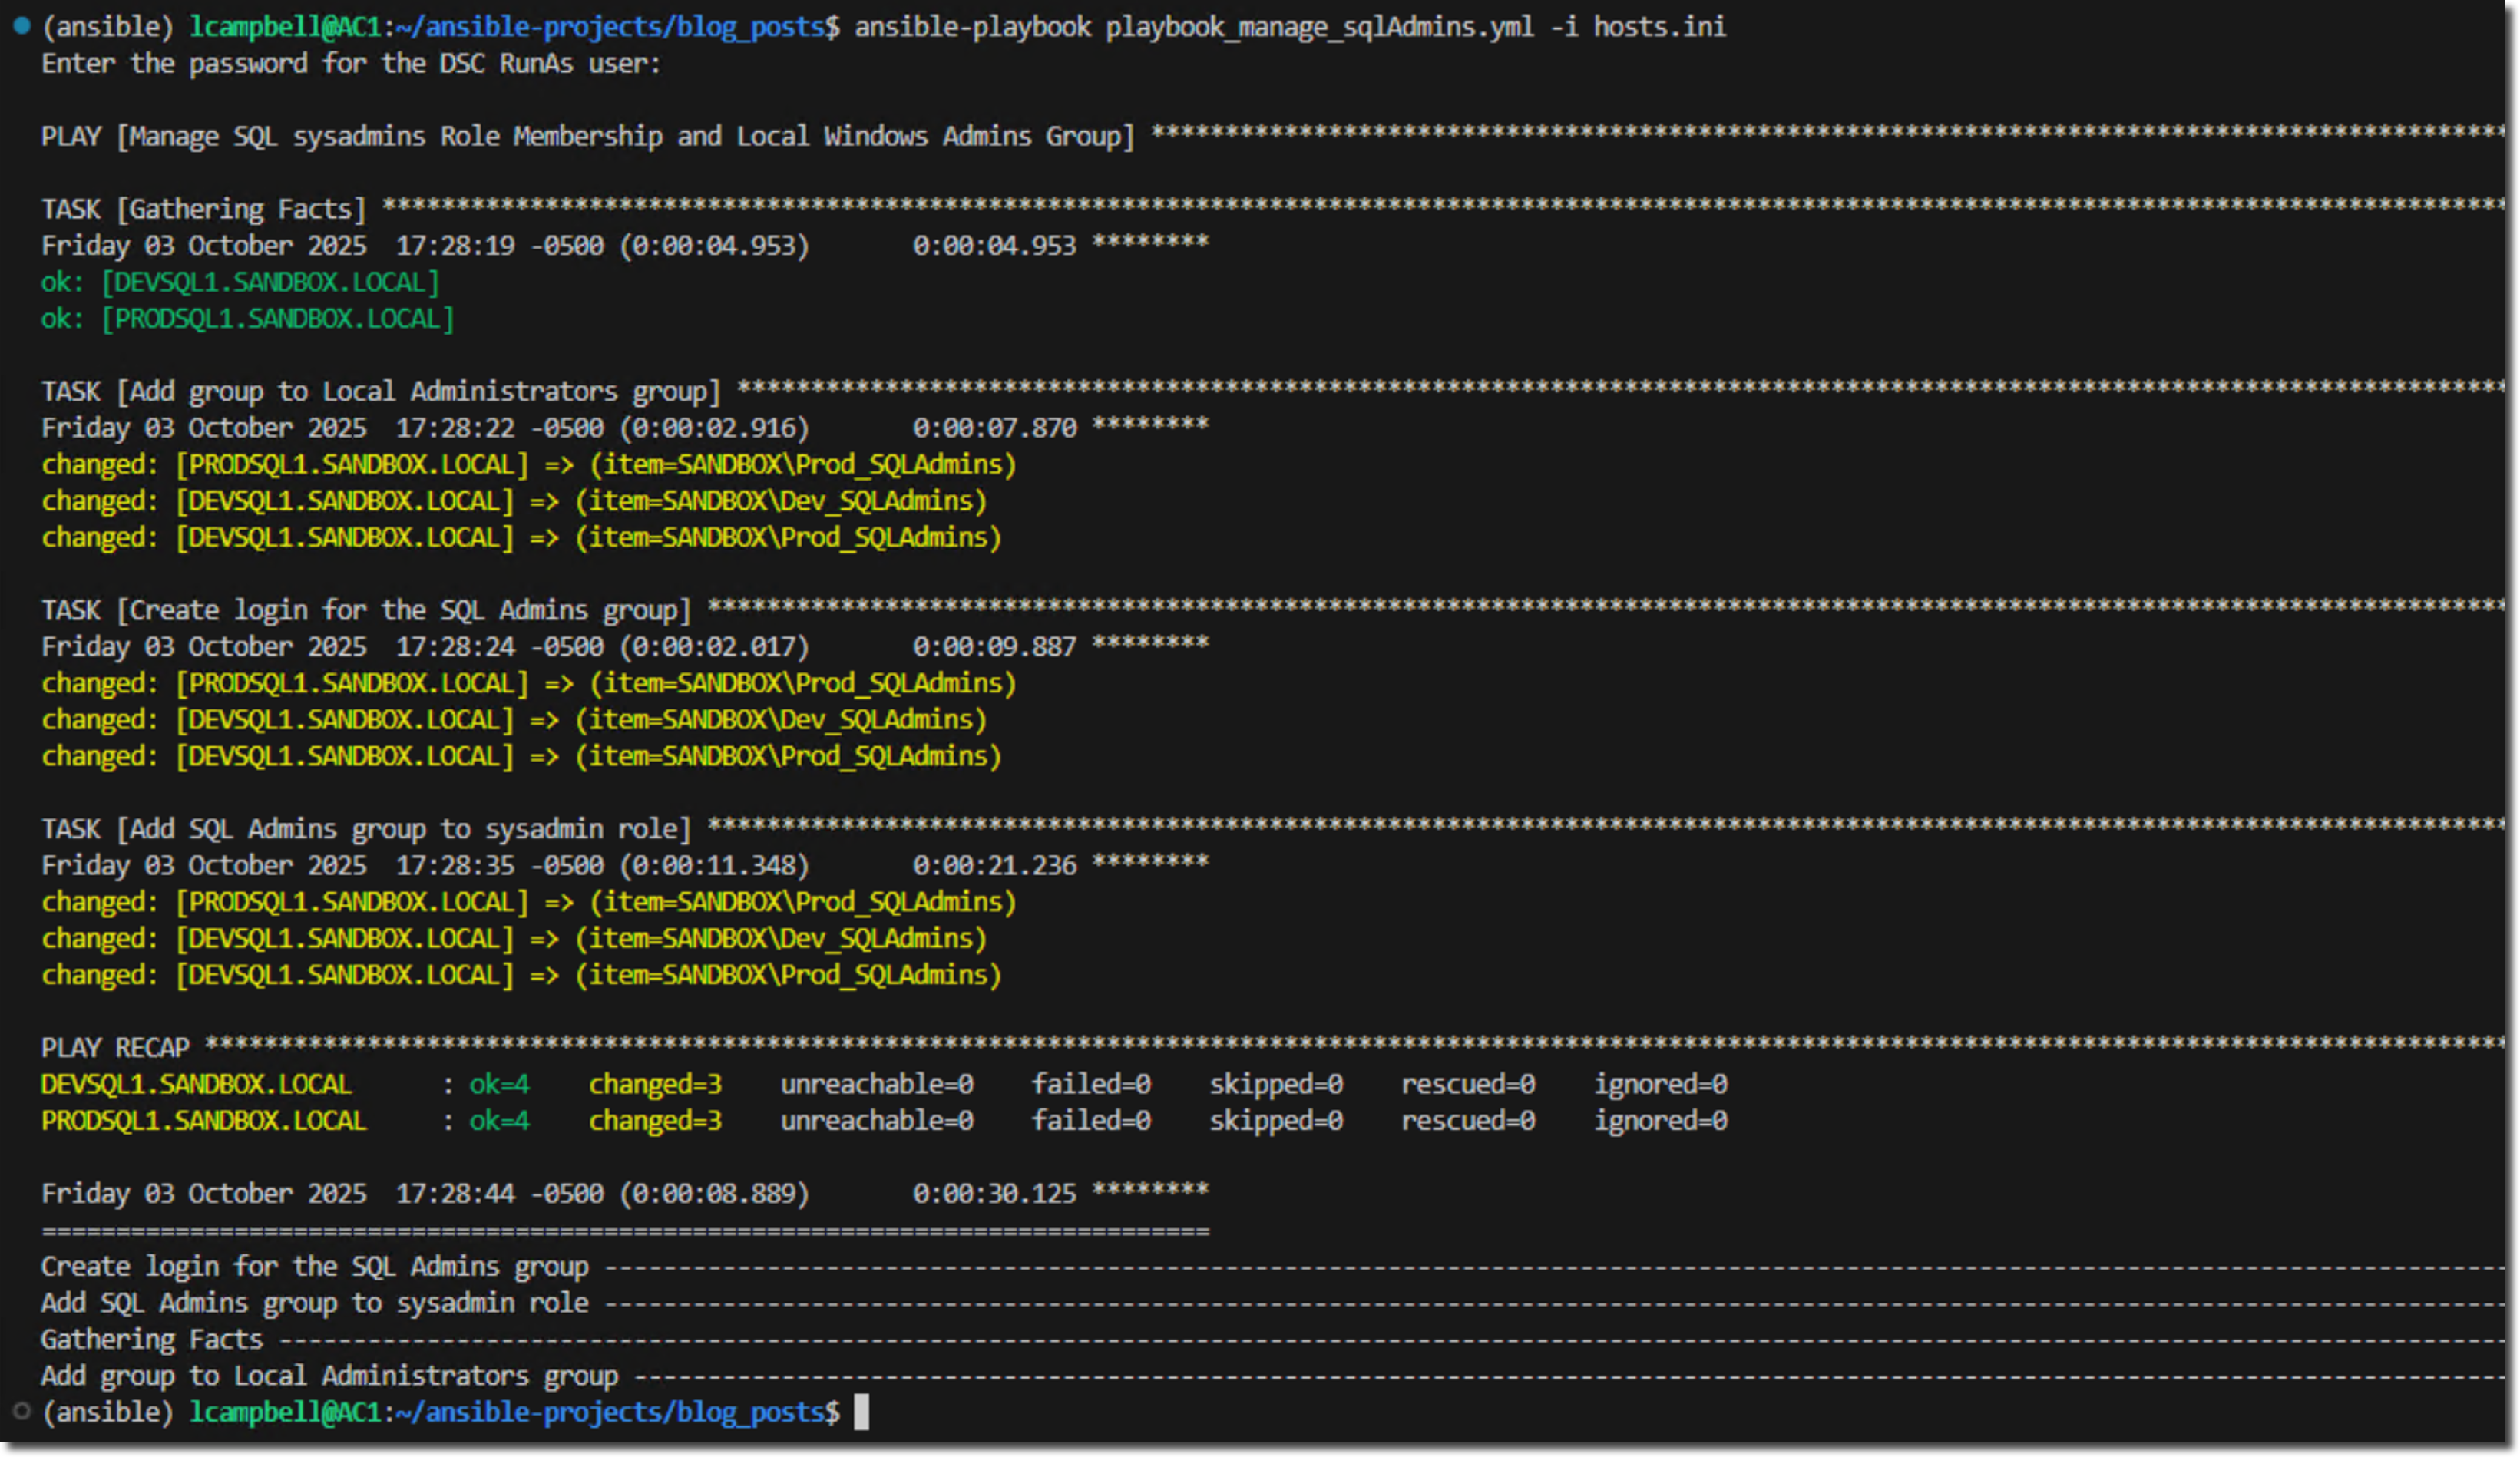
Now, review the end result.
DEVSQL1
Windows Administrators Group

SQL Server - Sysadmin role
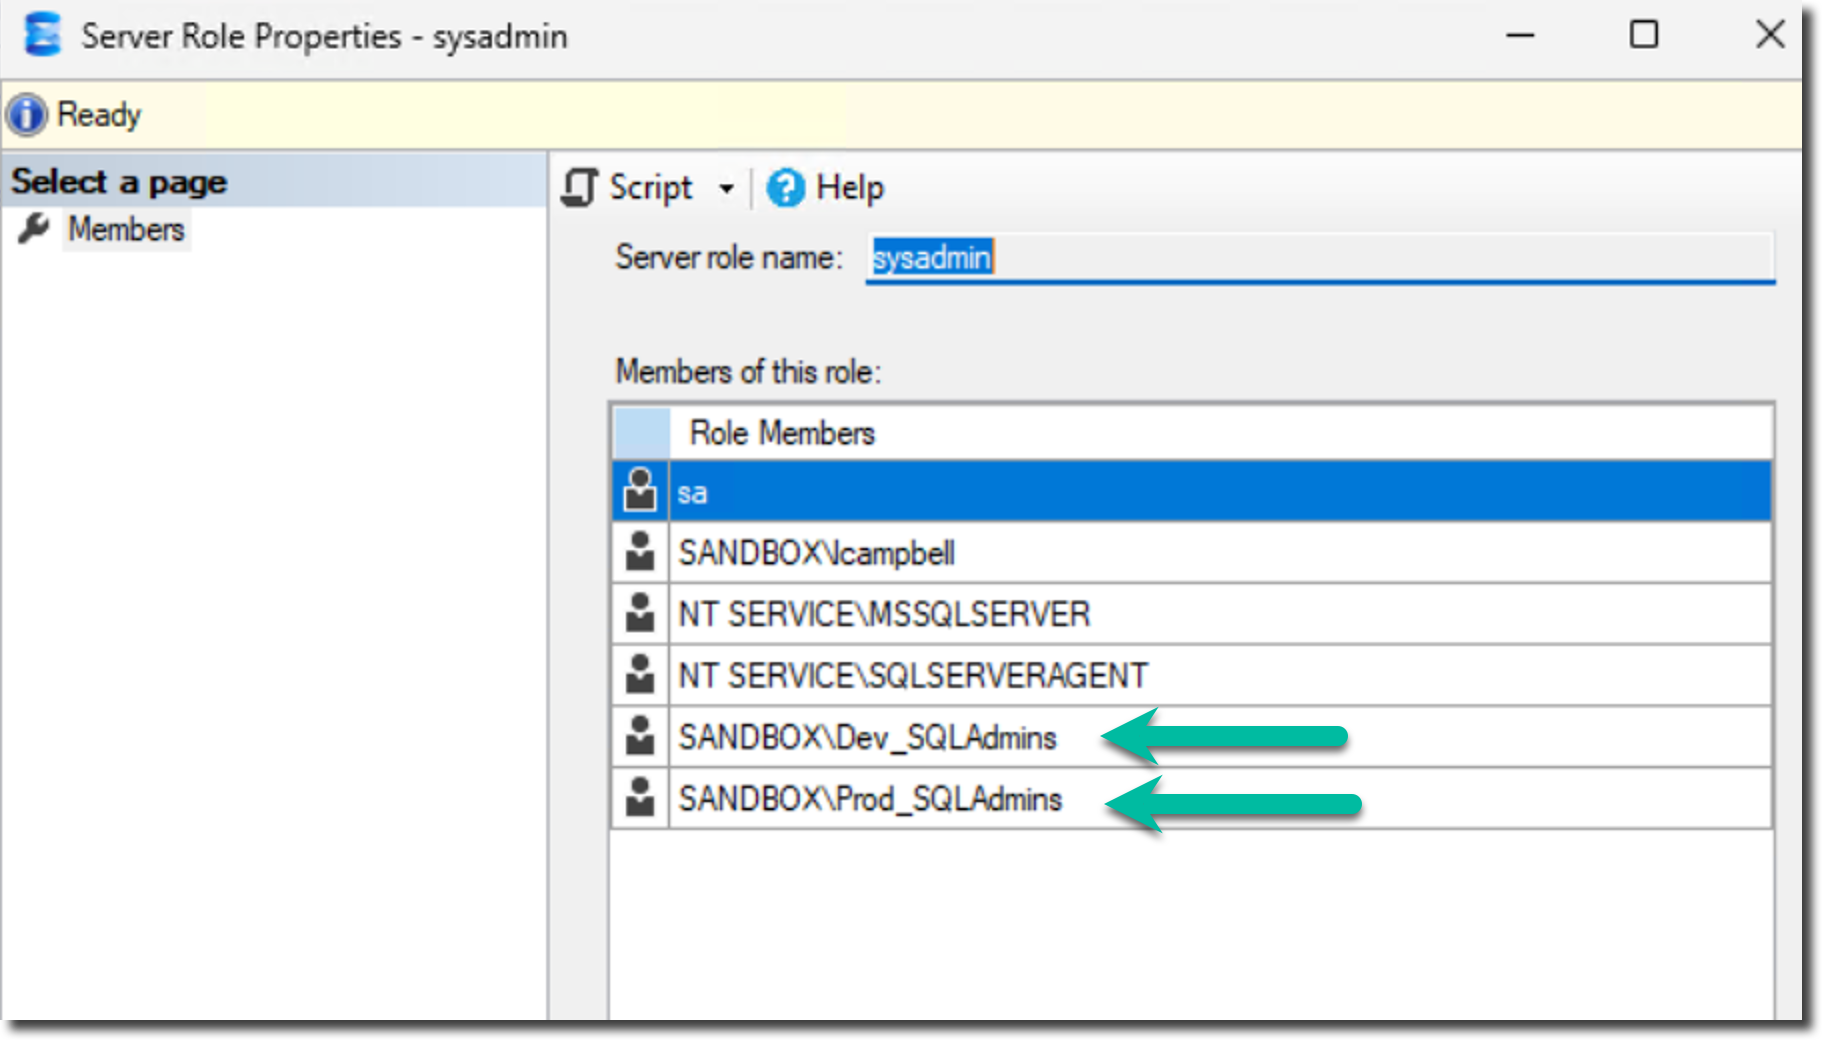
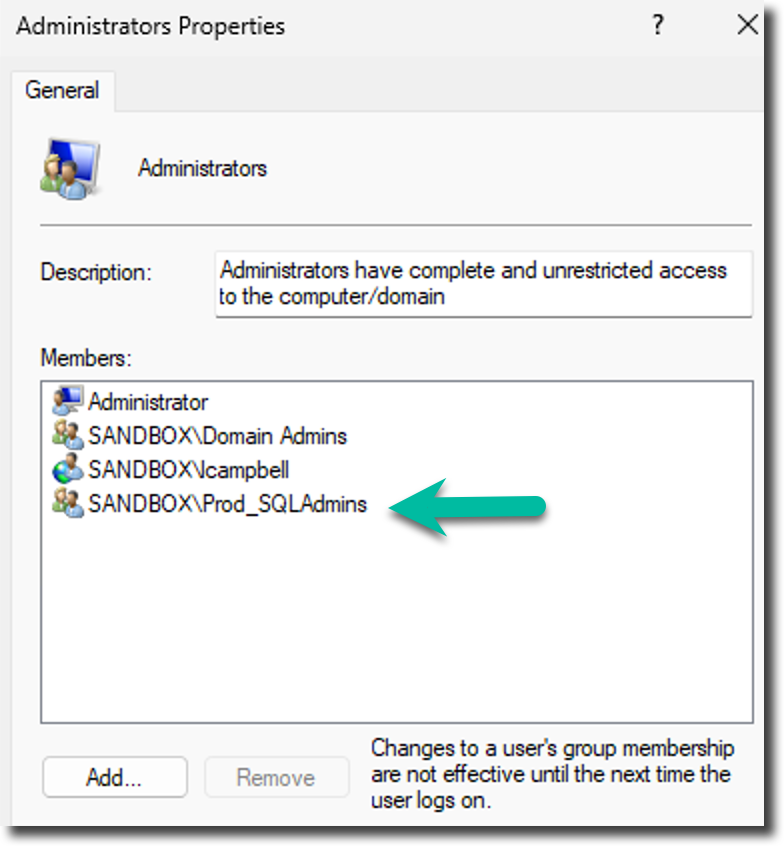
PRODSQL1
Windows Administrators Group
SQL Server - Sysadmin role
This playbook ensures that only the logins specified within a particular group_vars file are applied to the appropriate servers and instances. If you were to run the playbook again, what would happen? Does it pass the idempotency test?
Let's find out.
No changes were made.
Next Steps
You've moved beyond writing scripts to designing a scalable, secure, and self-documenting framework. Your playbook's logic is separate from your environment's configuration.
But notice the vars_prompt? It requires a human to type a password. This prevents true, unattended automation that can run on a schedule. How do we manage sensitive data like passwords and API keys securely?
That question sets the stage for our next series, where we'll kick things off by exploring why managing secrets is one of the most critical steps in building professional, trustworthy automation.
Get free access to my "SQL Server Automation: Your First Steps with Ansible" Guide
Get started with Ansible using this free guide. You'll discover how simple Ansible is to use, understand core concepts, and create two simple playbook examples.
When you signup, we'll send you periodic emails with additional free content.