SQL Server AG Patching with Ansible: Creating Your Role Structure
Apr 30, 2025
Ansible's inventory file is fundamental for defining and organizing the servers to be managed in a SQL Server Availability Group. It serves as the "address book" for Ansible to use when patching these instances.
Next up are roles.
We'll build an example role as part of this blog series (disclaimer here - don't take the example role and run it blindly in production). Think of roles as Ansible's "recipe book" or blueprint.
Like recipes that organize ingredients and steps to create a dish, roles organize tasks and variables to create a specific outcome.
Understanding Ansible Roles:
Before diving into implementation, let's clarify what a role is in Ansible. A role is a way to group related tasks, variables, and files together in a standardized directory structure. This organization makes your Ansible code more reusable, maintainable, and shareable.
In our SQL Server AG patching scenario, a well-structured role allows us to:
- Separate complex patching logic into manageable chunks
- Define default values while allowing customization
- Package everything needed for SQL Server patching in one place
- Reuse the same patching process across multiple environments
- Share our automation with colleagues or the community
Think of it this way: if our inventory file tells Ansible where to find our SQL Servers, roles tell it exactly what to do with them and how to do it.
The Standard Role Directory Structure:
Ansible roles follow a conventional directory structure. Understanding this structure is crucial for organizing our SQL Server AG patching automation effectively:
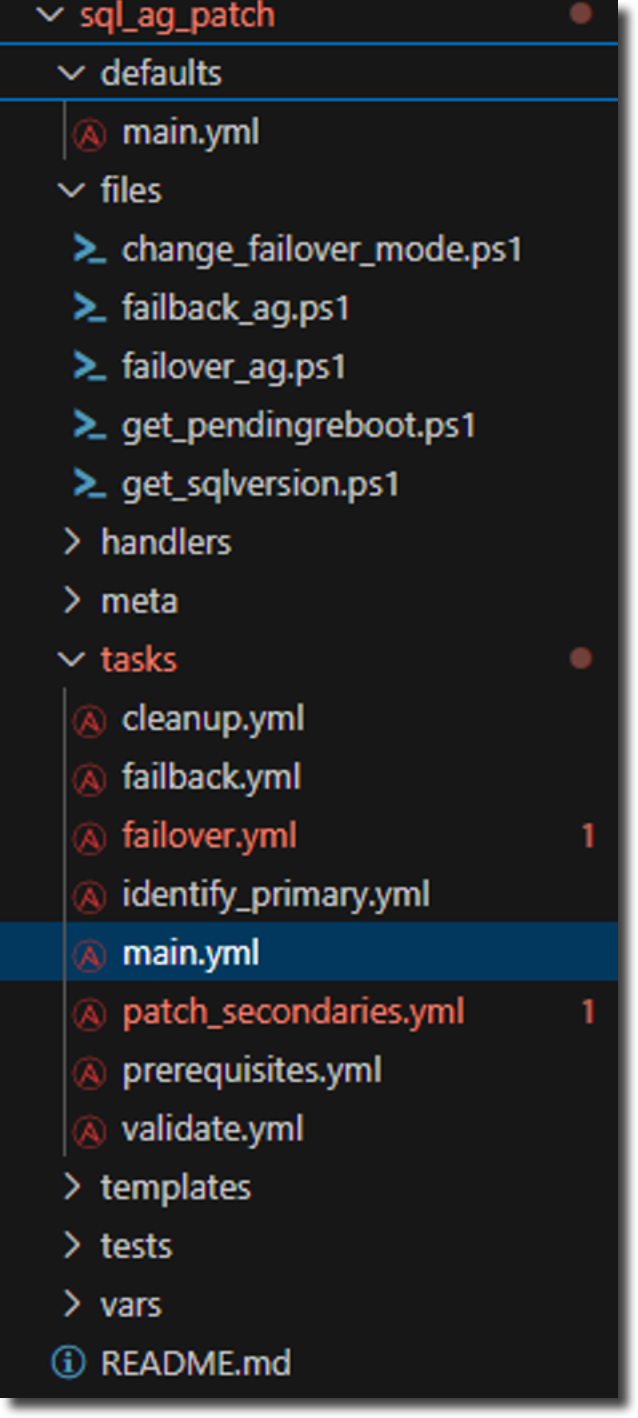
sql_ag_patch/
├── defaults/      # Default variables (lowest precedence)
│   └── main.yml
├── vars/          # Role variables (higher precedence than defaults)
│   └── main.yml
├── tasks/         # The core logic of your role
│   └── main.yml   # Entry point for tasks
├── handlers/      # Event responders (e.g., restart services)
│   └── main.yml
├── templates/     # Jinja2 templates (e.g., for SQL ini files)
│   └── *.j2
├── files/         # Static files to be deployed
├── meta/          # Role metadata and dependencies
│   └── main.yml
└── tests/         # Role tests (optional but recommended)
    ├── inventory
    └── test.yml
When Ansible processes a role, it automatically looks for these directories and files. Let's create our sql_ag_patch role with the key components needed for our SQL Server Availability Group patching process.
Creating Our SQL AG Patching Role:
There are two ways to create a role structure. Both are performed on the Ansible control node:
- Using the
ansible-galaxycommand-line tool:ansible-galaxy init sql_ag_patch - Creating the directories manually:
mkdir -p sql_ag_patch/{defaults,vars,tasks,handlers,templates,files,meta}/
touch sql_ag_patch/{defaults,vars,tasks,handlers,meta}/main.yml
For our SQL Server AG patching role, let's create the structure using ansible-galaxy for simplicity. Not all folders will be used.
Here's what this structure will look like in VS Code when we're finished.
Understanding the Role Components:
There are several files we'll utilize in this role. This allows us to separate tasks and logic categorized by their operation. We'll also use a default set of variables. We'll explore these in more detail in later posts.
defaults/main.yml
This file will hold default values for our role variables. These provide sensible defaults but can be overridden when needed. For our SQL AG patching automation, this will include variables like:
- Patch file location and checksum
- Installer arguments and options
- Timeout values for operations
- Flags for optional behaviors (failback, reboots, etc.)
- Temporary file paths
- Expected SQL Server version after patching
tasks/main.yml
This is the main entry point and orchestrator for our role. It doesn't contain detailed tasks itself, but rather imports other task files in the proper sequence:
- Run prerequisites and environment validation
- Identify the primary replica
- Validate AG health
- Patch secondary replicas first
- Fail over and patch the primary replica
- Verify all replicas were patched successfully
- Remove file(s) that were copied to each replica (the patch exe and SqlServer PowerShell module)
tasks/prerequisites.yml
This file will handle all prerequisite checks before we start the actual patching process:
- Verifies the checksum of the provided patch exe file.
- Ensures the required PowerShell modules are available on each managed node (the Windows server hosting SQL Server).
- Conditionally sets additional facts that we'll need later in the process
- Ensures that we're patching the correct version of SQL Server and determines if a patch is required
- Copies the patch to each managed node
tasks/identify_primary.yml
This file determines which replica is primary at the time of execution.
tasks/validate.yml
We will validate several aspects of each SQL Server instance before patching. Not only that, but we're going to use this file to perform a post-validation as well.
- Pre-Validation
- Is the AG healthy?
- Post-Validation
- Is the AG healthy?
- Does the final version of each SQL Server instance match our desired version?
tasks/patch_secondaries.yml
Here's where we start making changes only on SQL Server instances requiring the patch. Doing things like:
- Changing the secondary failover mode from automatic to manual
- Installing the patch
- Restarting the server
- Waiting for the restart and verifying that a connection to SQL Server can be made
- Changing the secondary failover mode from manual to automatic (if it was changed previously)
This task will leverage the change_failover_mode.ps1 script located in the files directory. I moved any extensive PowerShell code into separate files vs. placing the code directly in the task file (just to keep things cleaner).
tasks/patch_primary.yml
Next, the primary replica is patched if needed. Before we can patch it, though, we'll need to fail over to a secondary replica that meets the following criteria:
- Replica has been patched to the desired version
- Replica is in synchronous mode
- Replica is synchronized
The first replica that meets these criteria will become the new primary. We'll leverage the failover_ag.PS1 script to perform failover. After the failover, we'll utilize the tasks/patch_secondaries.yml task to patch the old primary. Then, if desired, we'll fail back, perform post validations, and remove the patch file from each managed node.
Role Dependencies and Requirements:
This role will depend on Windows-specific Ansible collections. Let's create a requirements.yml file to define these dependencies. You'll need to create this file on your control node.
collections:
  - name: ansible.windows
  - name: community.windows
This makes it easier for you to install the collections with:
ansible-galaxy collection install -r requirements.ymlThis role will also leverage the SqlServer PowerShell module to reduce the amount of PowerShell we need to write. You could store this module on a file share or the control node. I downloaded it directly to the control node and then copied it over to each managed node when needed. Here's the playbook I used to do that.
---
# playbook_SqlServerModule_download
- name: Download the SqlServer Module
  hosts: localhost

  tasks:
    - name: Install unzip on the ansible control node
      ansible.builtin.apt:
        name: unzip
        state: present
        update_cache: true
      become: true

    - name: Create the SqlServer directory on the ansible control node
      ansible.builtin.file:
        path: ./SqlServer
        state: directory

    - name: Download and extract SqlServer
      ansible.builtin.unarchive:
        src: https://www.powershellgallery.com/api/v2/package/SqlServer/
        dest: ./SqlServer
        remote_src: true
Build Plan:
Now that we've established our role structure, here's how we'll approach building it in future posts:
- Part 3: Building Prerequisites and Environment Discovery - We'll focus on the prerequisites.yml, identify_primary.yml, and get_sqlversions.ps1 files.
- Part 4: Patching Secondary Replicas - We'll build the validate.yml, patch_secondary.yml, and change_failover_mode.ps1 files.
- Part 5: Handling the Primary Replica - We'll tackle how to patch the primary replica and handle failover. This post will be all about the failover_ag.ps1 and failback_ag.ps1 files and how to handle some of the nuances I've encountered while working with the SqlServer module.
- Part 6: Verification and Validation - We'll implement thorough checks to ensure successful patching and a healthy AG.
Conclusion:
By establishing a well-structured Ansible role for SQL Server AG patching, we've created the foundation for a modular, reusable, and maintainable automation solution. This "recipe book" approach allows us to organize our automation logic in a clear, standard way that other Ansible users and DBAs will immediately understand.
In my next post, we'll add the actual task logic, starting with the prerequisites and environment discovery steps necessary before any patching begins.
What aspects of this role are you most interested in seeing implemented? Are there specific challenges you face when automating SQL Server patching that you'd like addressed in future posts?
Previous ← SQL Server AG Patching with Ansible: Building the Perfect Inventory File
Next → SQL Server AG Patching with Ansible: Prerequisites
Get free access to my "SQL Server Automation: Your First Steps with Ansible" Guide
Get started with Ansible using this free guide. You'll discover how simple Ansible is to use, understand core concepts, and create two simple playbook examples.
When you signup, we'll send you periodic emails with additional free content.